> ## Documentation Index
> Fetch the complete documentation index at: https://docs-dev-docs-event-stream-action-templates.mintlify.site/llms.txt
> Use this file to discover all available pages before exploring further.
> How to select different connection types for multiple login options with Lock V11.
# Select from Multiple Connection Options
export const AuthCodeBlock = ({filename, icon, language, highlight, children}) => {
const [displayText, setDisplayText] = useState(children);
const [copyText, setCopyText] = useState(children);
const wrapperRef = React.useRef(null);
useEffect(() => {
let unsubscribe = null;
function init() {
if (!window.autorun || !window.rootStore) {
return;
}
unsubscribe = window.autorun(() => {
let processedChildrenForDisplay = children;
let processedChildrenForCopy = children;
for (const [key, value] of window.rootStore.variableStore.values.entries()) {
const escapedKey = key.replaceAll(/[.*+?^${}()|[\]\\]/g, (String.raw)`\$&`);
let displayValue = value;
if (key === "{yourClientSecret}" && value !== "{yourClientSecret}") {
displayValue = value.substring(0, 3) + "*****MASKED*****";
}
processedChildrenForDisplay = processedChildrenForDisplay.replaceAll(new RegExp(escapedKey, "g"), displayValue);
processedChildrenForCopy = processedChildrenForCopy.replaceAll(new RegExp(escapedKey, "g"), value);
}
setDisplayText(processedChildrenForDisplay);
setCopyText(processedChildrenForCopy);
});
}
if (window.rootStore) {
init();
} else {
window.addEventListener("adu:storeReady", init);
}
return () => {
window.removeEventListener("adu:storeReady", init);
unsubscribe?.();
};
}, [children]);
useEffect(() => {
if (!wrapperRef.current) return;
const originalWriteText = navigator.clipboard.writeText.bind(navigator.clipboard);
let isOverriding = false;
const handleClick = e => {
const button = e.target.closest('[data-testid="copy-code-button"]');
if (!button || !wrapperRef.current.contains(button)) return;
isOverriding = true;
navigator.clipboard.writeText = text => {
if (isOverriding) {
isOverriding = false;
navigator.clipboard.writeText = originalWriteText;
return originalWriteText(copyText);
}
return originalWriteText(text);
};
setTimeout(() => {
if (isOverriding) {
isOverriding = false;
navigator.clipboard.writeText = originalWriteText;
}
}, 100);
};
const wrapper = wrapperRef.current;
wrapper.addEventListener('click', handleClick, true);
return () => {
wrapper.removeEventListener('click', handleClick, true);
if (navigator.clipboard.writeText !== originalWriteText) {
navigator.clipboard.writeText = originalWriteText;
}
};
}, [copyText]);
return
{displayText}
;
};
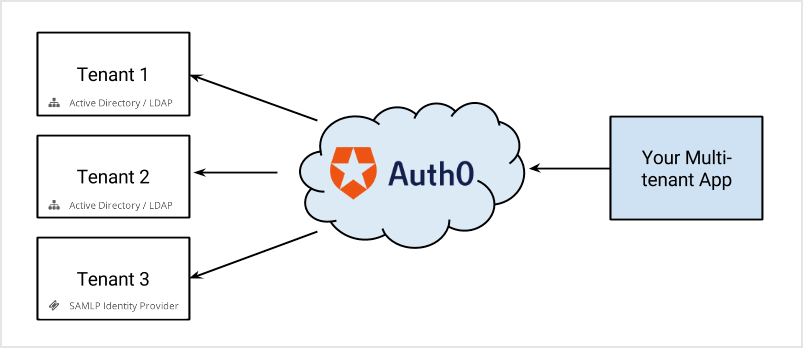
With Auth0 you can offer users multiple methods of authenticating. This is important with SaaS or multi-tenant apps, where many organizations use a single app. Each organization might use different systems such as LDAP, Active Directory, Google Workspace, or username/password stores.
In Auth0, you can associate different connections (methods of authentication) to specific applications, or directly to a tenant (as [domain connections](/docs/authenticate/identity-providers/promote-connections-to-domain-level)). When a user logs in, one of these connections will need to be selected as the one to use.
 Selecting the appropriate Identity Providers from multiple options is called "Home Realm Discovery".
If you use at most one database connection and zero or more social connections the selection process is straightforward. The user will either:
* Click on one of the social identity providers buttons (e.g., "Log in with Google")
* Enter their email and password (meaning "I will use the database connection").
But if the application or tenant has other connection types enabled (like enterprise connections or multiple databases) the selection process might be more involved. How do you indicate that a user wants to use a specific database connection if more than one is enabled? What if a user wants to use an enterprise connection to log in using Single Sign-on (SSO)?
If you implement [a custom login UI](/docs/customize/login-pages/classic-login/customize-with-lock-sdk) you have full control over the authentication flow. You can choose the connection based on context (like the given email address) or by asking the user, then provide the `connection` parameter to one of Auth0.js' [login methods](/docs/libraries/auth0js).
## Lock and multiple connections
Lock has built-in functionality for identity provider selection. For social connections, it shows logos for all those enabled in a particular app. It also provides username/email and password fields if a database connection or Active Directory connection is enabled.
You will only see a login button if it is the only connection enabled for the application (for [Classic Universal Login](/docs/authenticate/login/auth0-universal-login/universal-login-vs-classic-login/classic-experience) experience). Otherwise, you will need to use a [custom UI](/docs/customize/login-pages/classic-login/customize-with-lock-sdk) or the [New Universal Login](/docs/authenticate/login/auth0-universal-login/universal-login-vs-classic-login/universal-experience), which does support having a button for every social and enterprise connection enabled.
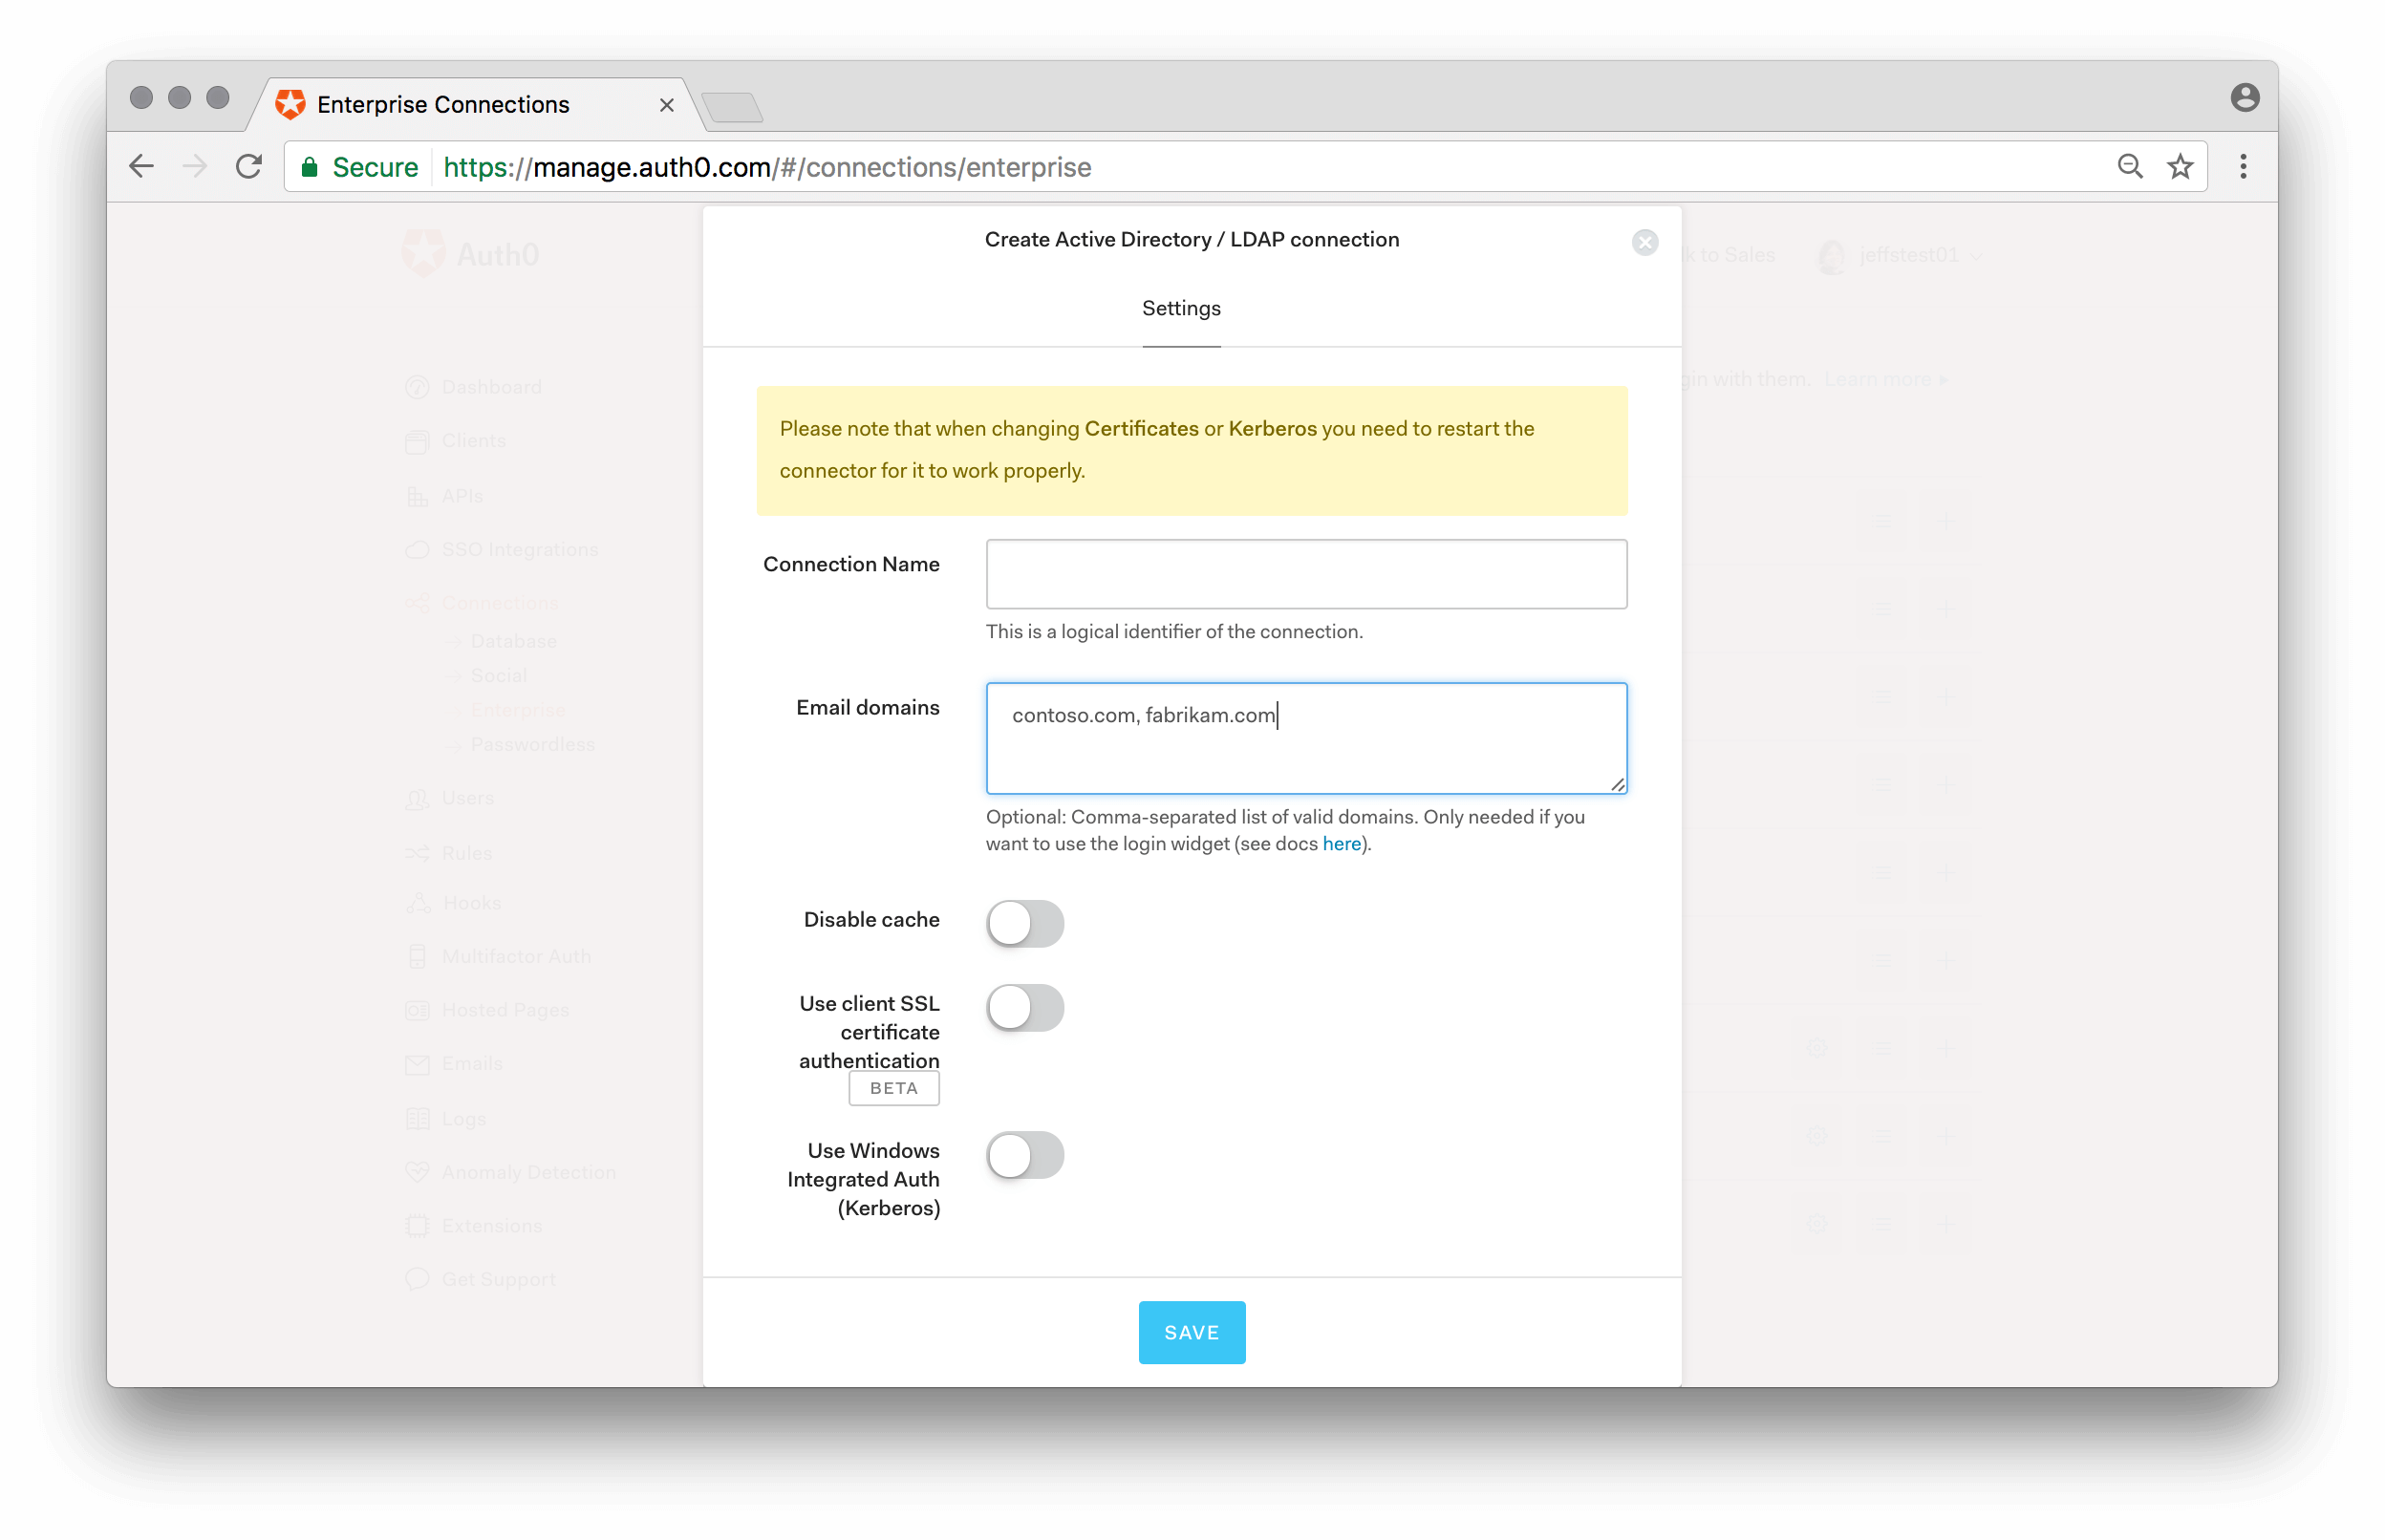
## Using email domains with enterprise connections
An additional feature in Lock is the use of email domains as a way of routing authentication requests. Enterprise connections in Auth0 can be mapped to `domains`. For example, when configuring an ADFS or a SAML-P identity provider:
Selecting the appropriate Identity Providers from multiple options is called "Home Realm Discovery".
If you use at most one database connection and zero or more social connections the selection process is straightforward. The user will either:
* Click on one of the social identity providers buttons (e.g., "Log in with Google")
* Enter their email and password (meaning "I will use the database connection").
But if the application or tenant has other connection types enabled (like enterprise connections or multiple databases) the selection process might be more involved. How do you indicate that a user wants to use a specific database connection if more than one is enabled? What if a user wants to use an enterprise connection to log in using Single Sign-on (SSO)?
If you implement [a custom login UI](/docs/customize/login-pages/classic-login/customize-with-lock-sdk) you have full control over the authentication flow. You can choose the connection based on context (like the given email address) or by asking the user, then provide the `connection` parameter to one of Auth0.js' [login methods](/docs/libraries/auth0js).
## Lock and multiple connections
Lock has built-in functionality for identity provider selection. For social connections, it shows logos for all those enabled in a particular app. It also provides username/email and password fields if a database connection or Active Directory connection is enabled.
You will only see a login button if it is the only connection enabled for the application (for [Classic Universal Login](/docs/authenticate/login/auth0-universal-login/universal-login-vs-classic-login/classic-experience) experience). Otherwise, you will need to use a [custom UI](/docs/customize/login-pages/classic-login/customize-with-lock-sdk) or the [New Universal Login](/docs/authenticate/login/auth0-universal-login/universal-login-vs-classic-login/universal-experience), which does support having a button for every social and enterprise connection enabled.
## Using email domains with enterprise connections
An additional feature in Lock is the use of email domains as a way of routing authentication requests. Enterprise connections in Auth0 can be mapped to `domains`. For example, when configuring an ADFS or a SAML-P identity provider:
 If a connection has domains mapped to it, then the password input field gets disabled automatically when a user enters an email with a mapped domain.
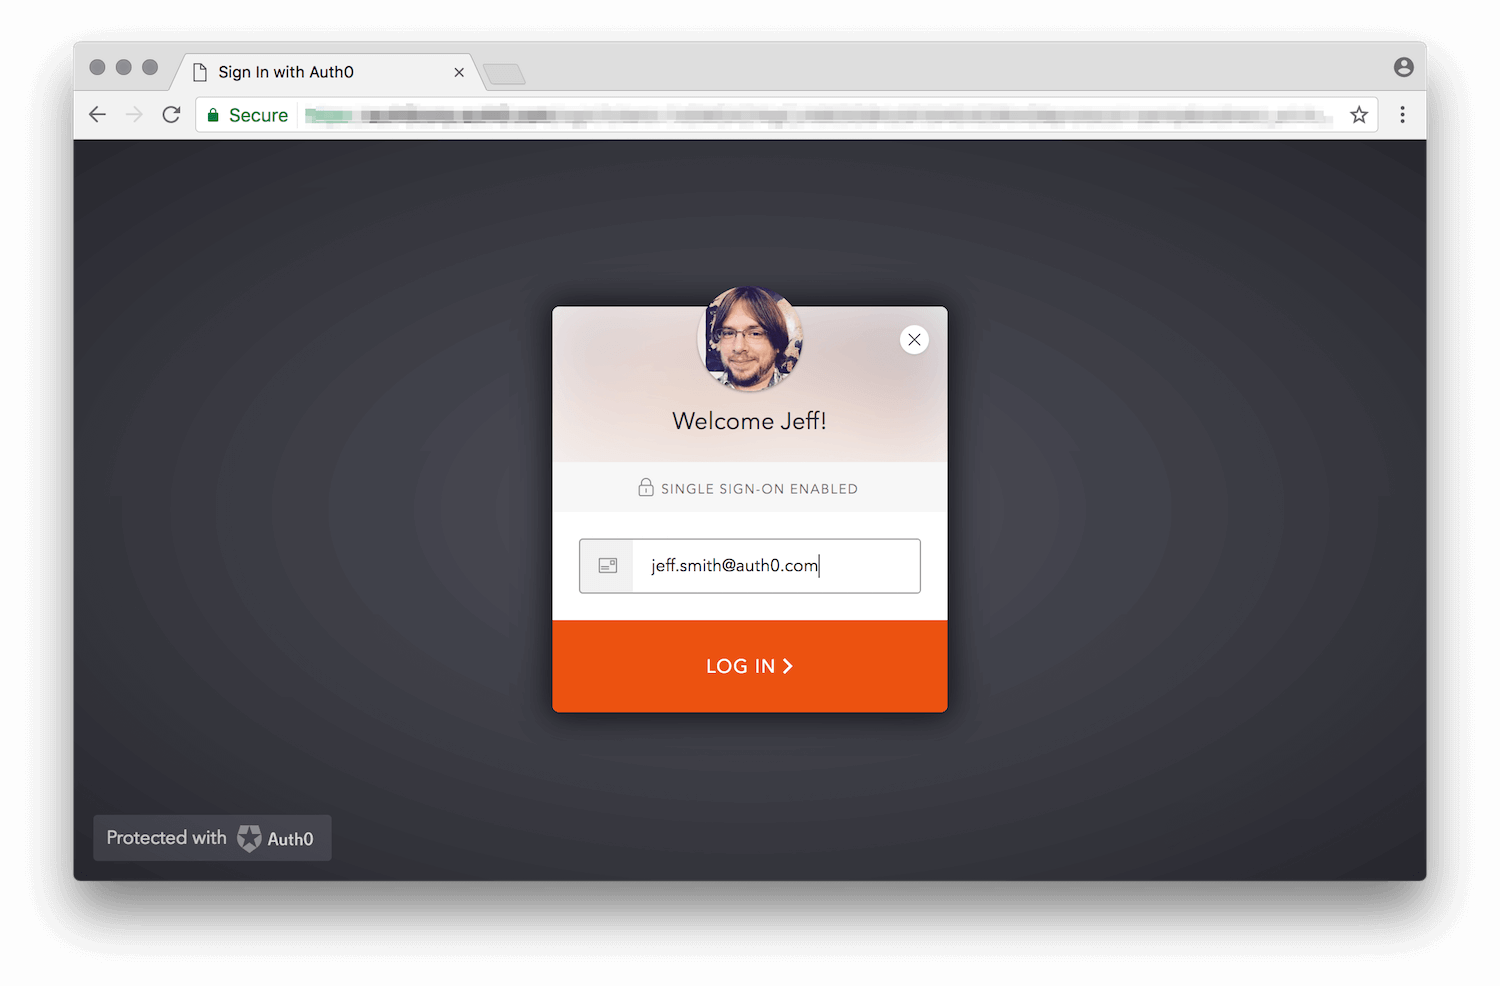 In the example above the domain `auth0.com` has been mapped to an enterprise connection.
Notice that you can associate multiple domains to a single connection.
## Selecting among multiple database connections
If your application has multiple database connections enabled, Lock needs to know which one to use. You can provide a [`connectionResolver` option](https://github.com/auth0/lock#other-options), which takes a function that decides the connection to use based on the user input and context. In this example an alternative database connection is used if the email domain is "auth0.com":
```js lines theme={null}
var options = {
connectionResolver: function (username, context, cb) {
var domain = username.indexOf('@') !== -1 && username.split('@')[1];
if (domain && domain ==='auth0.com') {
// If the username is test@auth0.com, the connection used will be the `auth0-users` connection.
cb({ type: 'database', name: 'auth0-users' });
} else {
// Use the default approach to figure it out the connection
cb(null);
}
}
}
```
You can use the [`defaultDatabaseConnection` option](/docs/libraries/lock/lock-configuration#defaultdatabaseconnection-string-) to specify the database connection that will be used by default.
## Filtering available connections programmatically
The [`allowedConnections` option](/docs/libraries/lock/lock-configuration#allowedconnections-array-) in Lock lets you indicate which of the available connections should be presented as an option to the user.
This lets you tailor the experience based on additional input or context (e.g. "Click here to log in as a student, or here to log in as a faculty member").
export const codeExample = `var lock = new Auth0Lock(
'{yourClientId}',
'{yourDomain}',
{
allowedConnections: ['yourConnection'];
}
);`;
Note that you can also provide the `allowedConnections` option to the `lock.show()` method if providing it at instantiation is not ideal for your use case. Please refer to the [API documentation](/docs/libraries/lock/lock-api-reference) for the `show` method for more information.
## Sending realm information from the application
Sometimes the application requesting an authentication can know, in advance, the realm intended to be used by the user. E.g. a multi-tenant application might use URLs in the form of: `https://{customer}.yoursite.com` or `https://www.yoursite.com/{customer}`. When a user arrives at your application with the vanity URL, you can pick up that `tenant` value and pass it as the `login_hint` in the `authorize` request:
`https://{yourDomain}/authorize?client_id=[...]&login_hint={customer}`
`login_hint` is a hint to the authorization server (Auth0) to indicate what the user might use to log in. In this case, based on the URL where the user landed, we treat the "customer" as the realm.
The default hosted login page code uses it to pre-fill the email field in Lock, but we can modify the code to alter the default database connection to be used if a realm is provided instead of an actual email address:
```js lines expandable theme={null}
// from the default Hosted Login Page template
var config = JSON.parse(decodeURIComponent(escape(window.atob('@@config@@'))));
[...]
var loginHint = config.extraParams.login_hint;
var realmHint;
// if the login hint is not an email address, we treat it as a realm hint
if (loginHint && loginHint.indexOf('@') < 0) {
realmHint = loginHint;
loginHint = null;
}
// now we map the realm into an actual database
var defaultDatabaseConnection;
if (realmHint === 'acme') {
defaultDatabaseConnection = 'acme-users';
} else if (realmHint === 'auth0') {
defaultDatabaseConnection = 'auth0-DB';
}
// When configuring Lock, we provide the values obtained before
var lock = new Auth0Lock(config.clientID, config.auth0Domain, {
[...] // other options
prefill: loginHint ? { email: loginHint, username: loginHint } : null,
defaultDatabaseConnection: defaultDatabaseConnection
}
```
The above code is, of course, just a sample. You could expand this logic to filter out social connections, or to set a default connection to be used even if an email address is provided as a `login_hint`.
Mapping the "customer" as a realm is an arbitrary design decision for this example. But it is generally a good idea to isolate applications from the actual "connection" concept used within Auth0 and use the more abstract "realm" concept instead, possibly doing a realm-to-connection mapping within the hosted login page (where it's easier to make changes if necessary).
In the example above the domain `auth0.com` has been mapped to an enterprise connection.
Notice that you can associate multiple domains to a single connection.
## Selecting among multiple database connections
If your application has multiple database connections enabled, Lock needs to know which one to use. You can provide a [`connectionResolver` option](https://github.com/auth0/lock#other-options), which takes a function that decides the connection to use based on the user input and context. In this example an alternative database connection is used if the email domain is "auth0.com":
```js lines theme={null}
var options = {
connectionResolver: function (username, context, cb) {
var domain = username.indexOf('@') !== -1 && username.split('@')[1];
if (domain && domain ==='auth0.com') {
// If the username is test@auth0.com, the connection used will be the `auth0-users` connection.
cb({ type: 'database', name: 'auth0-users' });
} else {
// Use the default approach to figure it out the connection
cb(null);
}
}
}
```
You can use the [`defaultDatabaseConnection` option](/docs/libraries/lock/lock-configuration#defaultdatabaseconnection-string-) to specify the database connection that will be used by default.
## Filtering available connections programmatically
The [`allowedConnections` option](/docs/libraries/lock/lock-configuration#allowedconnections-array-) in Lock lets you indicate which of the available connections should be presented as an option to the user.
This lets you tailor the experience based on additional input or context (e.g. "Click here to log in as a student, or here to log in as a faculty member").
export const codeExample = `var lock = new Auth0Lock(
'{yourClientId}',
'{yourDomain}',
{
allowedConnections: ['yourConnection'];
}
);`;
Note that you can also provide the `allowedConnections` option to the `lock.show()` method if providing it at instantiation is not ideal for your use case. Please refer to the [API documentation](/docs/libraries/lock/lock-api-reference) for the `show` method for more information.
## Sending realm information from the application
Sometimes the application requesting an authentication can know, in advance, the realm intended to be used by the user. E.g. a multi-tenant application might use URLs in the form of: `https://{customer}.yoursite.com` or `https://www.yoursite.com/{customer}`. When a user arrives at your application with the vanity URL, you can pick up that `tenant` value and pass it as the `login_hint` in the `authorize` request:
`https://{yourDomain}/authorize?client_id=[...]&login_hint={customer}`
`login_hint` is a hint to the authorization server (Auth0) to indicate what the user might use to log in. In this case, based on the URL where the user landed, we treat the "customer" as the realm.
The default hosted login page code uses it to pre-fill the email field in Lock, but we can modify the code to alter the default database connection to be used if a realm is provided instead of an actual email address:
```js lines expandable theme={null}
// from the default Hosted Login Page template
var config = JSON.parse(decodeURIComponent(escape(window.atob('@@config@@'))));
[...]
var loginHint = config.extraParams.login_hint;
var realmHint;
// if the login hint is not an email address, we treat it as a realm hint
if (loginHint && loginHint.indexOf('@') < 0) {
realmHint = loginHint;
loginHint = null;
}
// now we map the realm into an actual database
var defaultDatabaseConnection;
if (realmHint === 'acme') {
defaultDatabaseConnection = 'acme-users';
} else if (realmHint === 'auth0') {
defaultDatabaseConnection = 'auth0-DB';
}
// When configuring Lock, we provide the values obtained before
var lock = new Auth0Lock(config.clientID, config.auth0Domain, {
[...] // other options
prefill: loginHint ? { email: loginHint, username: loginHint } : null,
defaultDatabaseConnection: defaultDatabaseConnection
}
```
The above code is, of course, just a sample. You could expand this logic to filter out social connections, or to set a default connection to be used even if an email address is provided as a `login_hint`.
Mapping the "customer" as a realm is an arbitrary design decision for this example. But it is generally a good idea to isolate applications from the actual "connection" concept used within Auth0 and use the more abstract "realm" concept instead, possibly doing a realm-to-connection mapping within the hosted login page (where it's easier to make changes if necessary).