> ## Documentation Index
> Fetch the complete documentation index at: https://docs-dev-docs-event-stream-action-templates.mintlify.site/llms.txt
> Use this file to discover all available pages before exploring further.
# 複数の接続オプションから選択する
> Lock V11で複数のログインオプションに異なる接続タイプを選択する方法について説明します。
export const AuthCodeBlock = ({filename, icon, language, highlight, children}) => {
const [displayText, setDisplayText] = useState(children);
const [copyText, setCopyText] = useState(children);
const wrapperRef = React.useRef(null);
useEffect(() => {
let unsubscribe = null;
function init() {
if (!window.autorun || !window.rootStore) {
return;
}
unsubscribe = window.autorun(() => {
let processedChildrenForDisplay = children;
let processedChildrenForCopy = children;
for (const [key, value] of window.rootStore.variableStore.values.entries()) {
const escapedKey = key.replaceAll(/[.*+?^${}()|[\]\\]/g, (String.raw)`\$&`);
let displayValue = value;
if (key === "{yourClientSecret}" && value !== "{yourClientSecret}") {
displayValue = value.substring(0, 3) + "*****MASKED*****";
}
processedChildrenForDisplay = processedChildrenForDisplay.replaceAll(new RegExp(escapedKey, "g"), displayValue);
processedChildrenForCopy = processedChildrenForCopy.replaceAll(new RegExp(escapedKey, "g"), value);
}
setDisplayText(processedChildrenForDisplay);
setCopyText(processedChildrenForCopy);
});
}
if (window.rootStore) {
init();
} else {
window.addEventListener("adu:storeReady", init);
}
return () => {
window.removeEventListener("adu:storeReady", init);
unsubscribe?.();
};
}, [children]);
useEffect(() => {
if (!wrapperRef.current) return;
const originalWriteText = navigator.clipboard.writeText.bind(navigator.clipboard);
let isOverriding = false;
const handleClick = e => {
const button = e.target.closest('[data-testid="copy-code-button"]');
if (!button || !wrapperRef.current.contains(button)) return;
isOverriding = true;
navigator.clipboard.writeText = text => {
if (isOverriding) {
isOverriding = false;
navigator.clipboard.writeText = originalWriteText;
return originalWriteText(copyText);
}
return originalWriteText(text);
};
setTimeout(() => {
if (isOverriding) {
isOverriding = false;
navigator.clipboard.writeText = originalWriteText;
}
}, 100);
};
const wrapper = wrapperRef.current;
wrapper.addEventListener('click', handleClick, true);
return () => {
wrapper.removeEventListener('click', handleClick, true);
if (navigator.clipboard.writeText !== originalWriteText) {
navigator.clipboard.writeText = originalWriteText;
}
};
}, [copyText]);
return
{displayText}
;
};
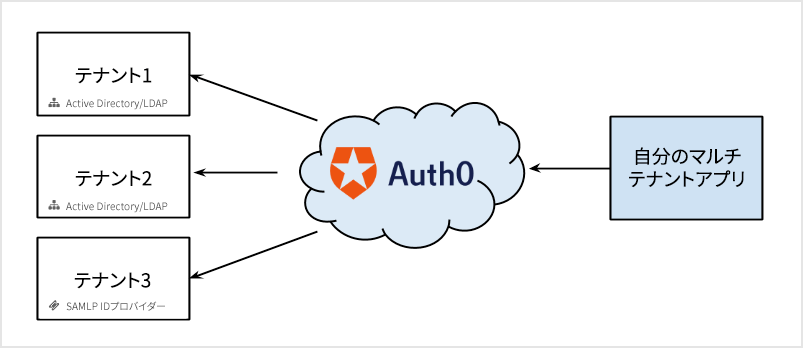
Auth0では、ユーザーに複数の認証方法を提供することができます。これは、多くの組織で単一のアプリが使用される、SaaSやマルチテナントアプリでは重要です。各組織は、LDAP、Active Directory、Google Workspace、ユーザー名とパスワードのストアなど、異なるシステムを使用しているかもしれません。
Auth0では、異なる接続(認証方法)を特定のアプリケーションに関連付けたり、直接テナントに([ドメイン接続](/docs/ja-jp/authenticate/identity-providers/promote-connections-to-domain-level)として)関連付けたりできます。ユーザーがログインする際には、この中の1つの接続を選択して使う必要があります。
 複数のオプションから適切なIDプロバイダーを選択することを、「HRD:ホーム領域検出」と呼びます。
1つ以下のデータベース接続と0個以上のソーシャル接続を使用する場合の選択手順は簡単です。ユーザーは以下のいずれかを行います。
* ソーシャルIDプロバイダー(「Googleでログイン」など)のボタンを1つ選んでクリックする
* メールアドレスとパスワードを入力する(データベース接続の使用を選んだことになります)
ただし、アプリケーションやテナントに他の接続タイプ(エンタープライズ接続や複数のデータベースなど)が有効化されている場合には、選択手順が複雑になる可能性があります。複数のデータベース接続が有効な場合、特定のデータベース接続を使用したいというユーザーの選択をどのように示せばよいのか。ユーザーがエンタープライズ接続でシングルサインオン(SSO)を使ってログインしたい場合はどうすればいいのか。
[カスタムログインUI](/docs/ja-jp/customize/login-pages/classic-login/customize-with-lock-sdk)を実装すると、認証フローを自在に構成することができます。接続の選択では、コンテキスト(提供されたメールアドレスなど)を基にするか、ユーザーに尋ねます。その後、`connection`パラメーターをAuth0.jsの[ログインメソッド](/docs/ja-jp/libraries/auth0js)に渡します。
## Lockと複数の接続
LockはIDプロバイダーを選択する機能性を備えています。ソーシャル接続には、特定のアプリで有効化されているものすべてのロゴが表示されます。また、データベース接続やActive Directory接続が有効な場合は、ユーザー名またはメールアドレスとパスワードの入力フィールドが提供されます。
ログインボタンは、アプリケーションに1つの接続だけが有効化されている場合([クラシックユニバーサルログイン](/docs/ja-jp/authenticate/login/auth0-universal-login/universal-login-vs-classic-login/classic-experience)エクスペリエンス)にのみ表示されます。それ以外の場合には、[カスタムUI](/docs/ja-jp/customize/login-pages/classic-login/customize-with-lock-sdk)または[新しいユニバーサルログイン](/docs/ja-jp/authenticate/login/auth0-universal-login/universal-login-vs-classic-login/universal-experience)を使う必要があります。そうすると、有効化されているソーシャル接続やエンタープライズ接続のすべてにボタンが表示されます。
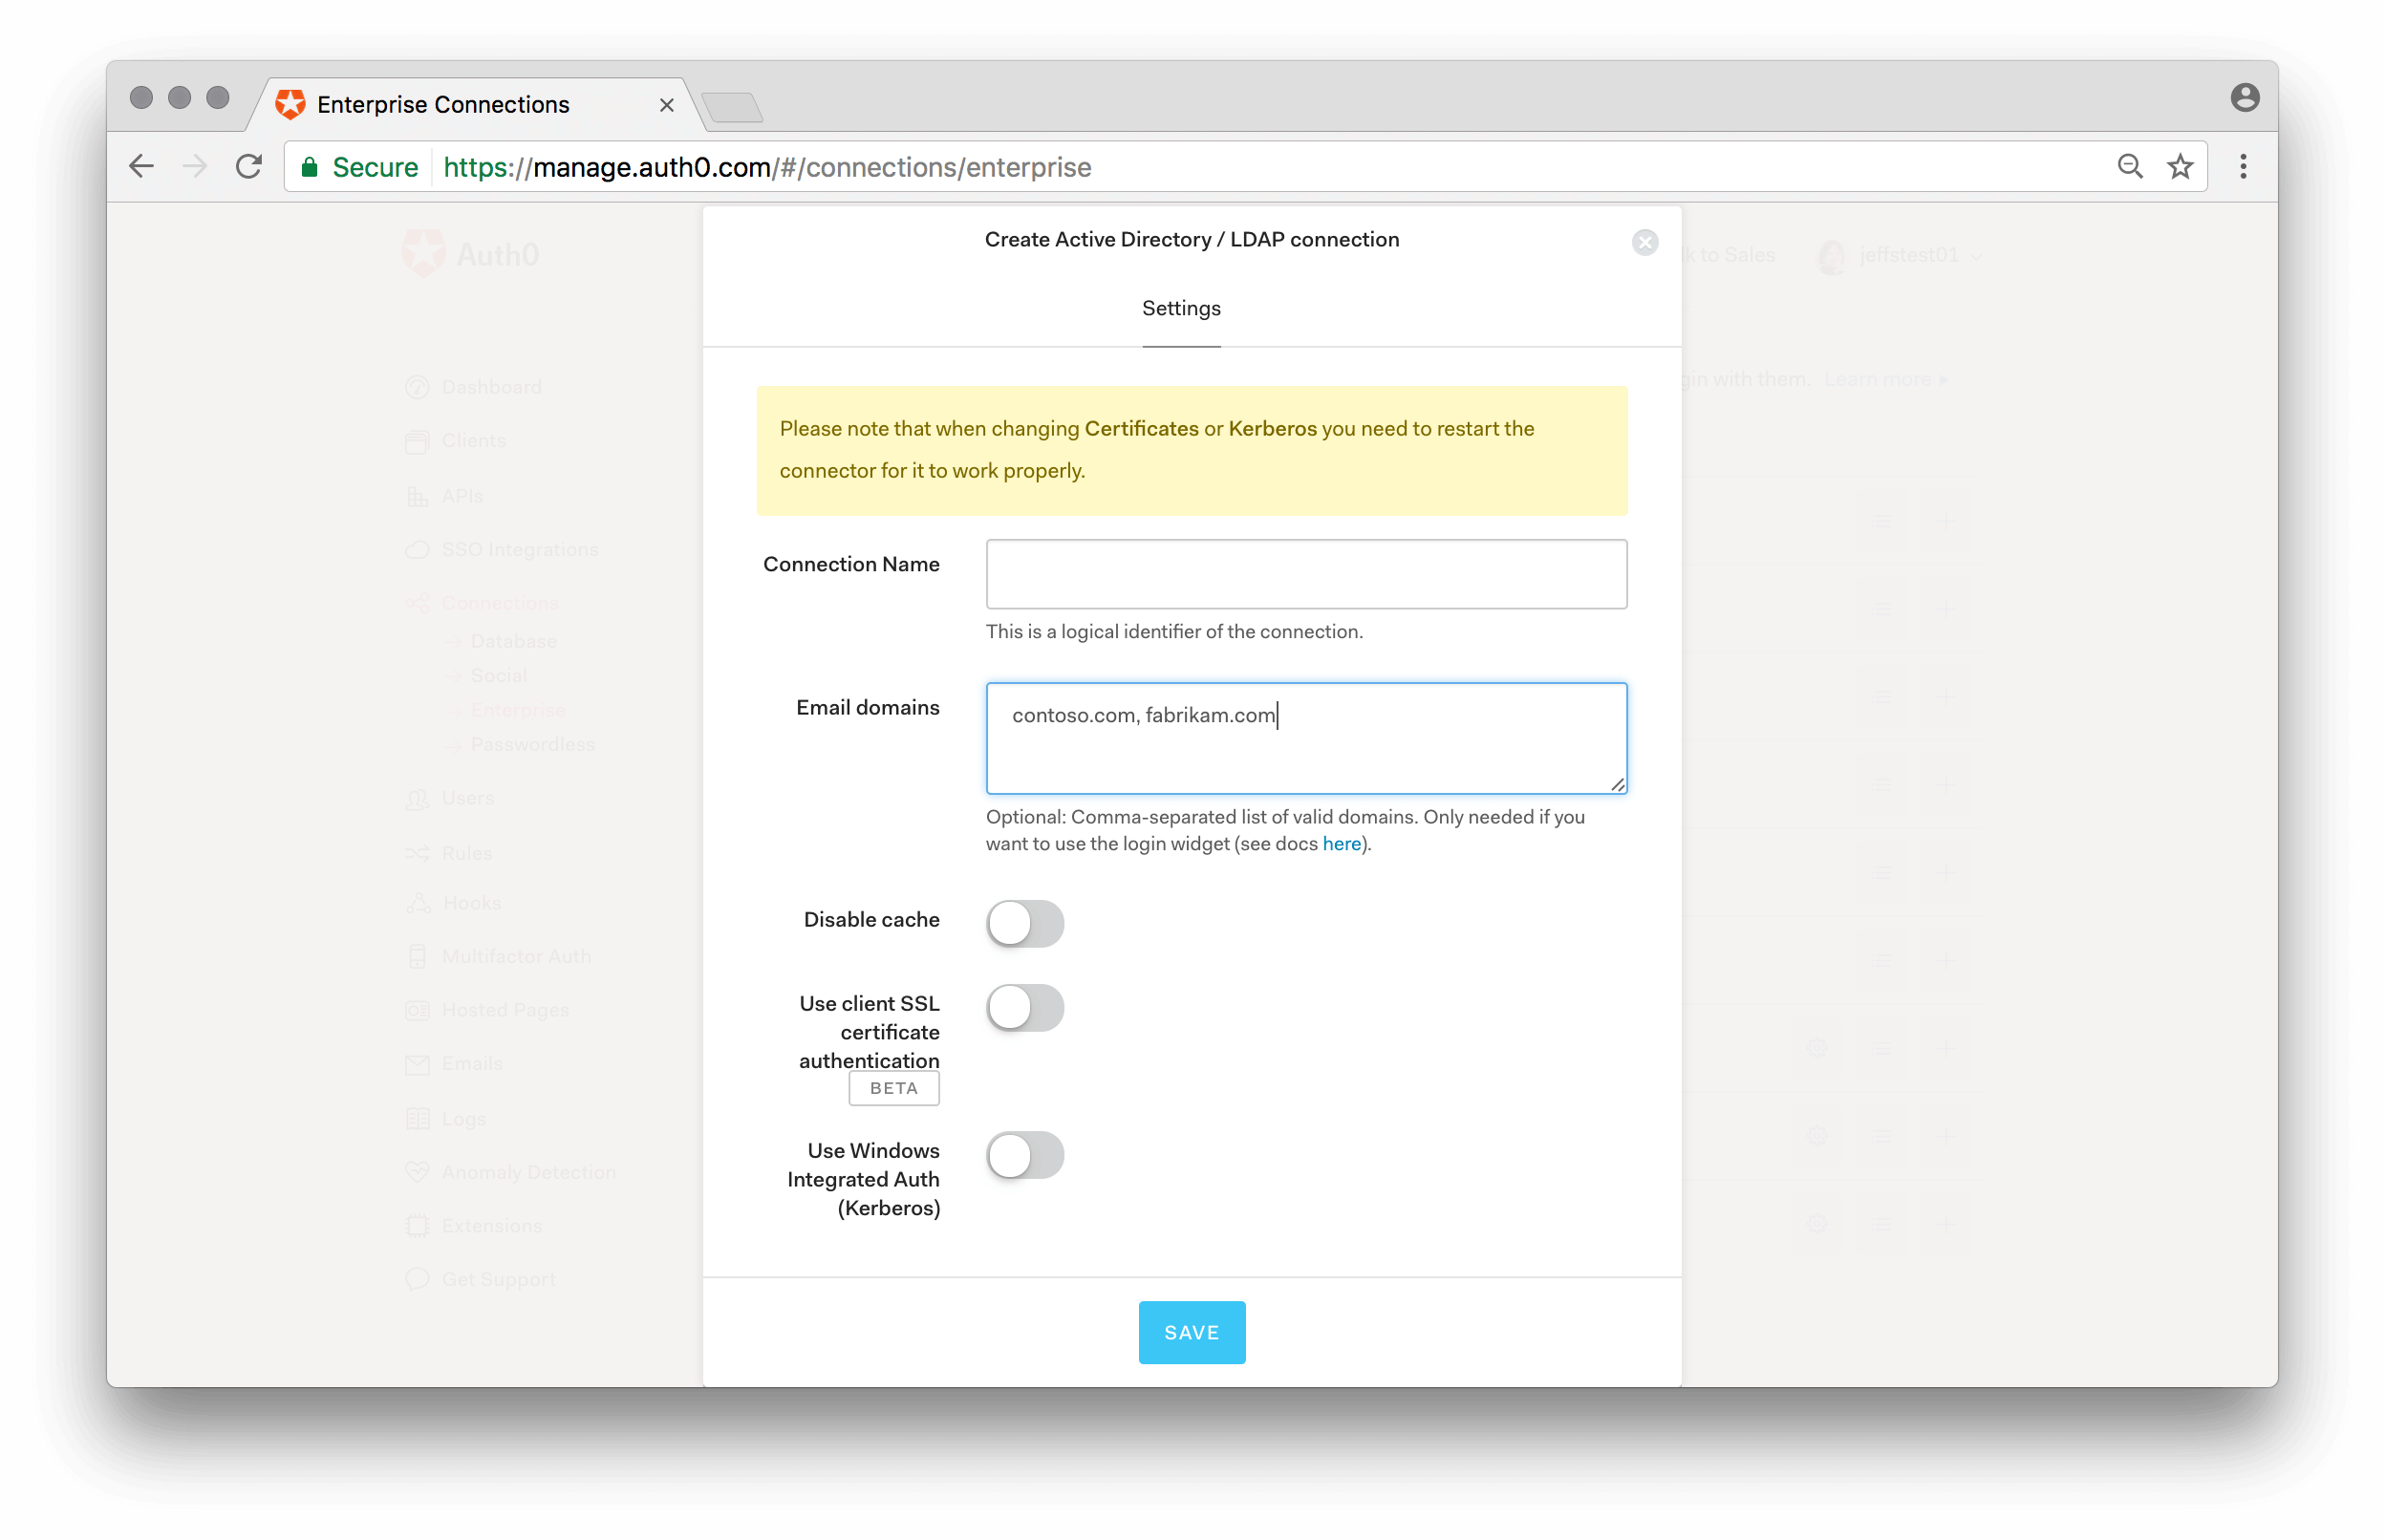
## エンタープライズ接続でメールドメインを使用する
Lockには、メールのドメインを使って認証要求をルーティングする機能も備わっています。Auth0のエンタープライズ接続`ドメイン`にマッピングすることができます。たとえば、ADFSやSAML-P IDプロバイダーの構成では:
複数のオプションから適切なIDプロバイダーを選択することを、「HRD:ホーム領域検出」と呼びます。
1つ以下のデータベース接続と0個以上のソーシャル接続を使用する場合の選択手順は簡単です。ユーザーは以下のいずれかを行います。
* ソーシャルIDプロバイダー(「Googleでログイン」など)のボタンを1つ選んでクリックする
* メールアドレスとパスワードを入力する(データベース接続の使用を選んだことになります)
ただし、アプリケーションやテナントに他の接続タイプ(エンタープライズ接続や複数のデータベースなど)が有効化されている場合には、選択手順が複雑になる可能性があります。複数のデータベース接続が有効な場合、特定のデータベース接続を使用したいというユーザーの選択をどのように示せばよいのか。ユーザーがエンタープライズ接続でシングルサインオン(SSO)を使ってログインしたい場合はどうすればいいのか。
[カスタムログインUI](/docs/ja-jp/customize/login-pages/classic-login/customize-with-lock-sdk)を実装すると、認証フローを自在に構成することができます。接続の選択では、コンテキスト(提供されたメールアドレスなど)を基にするか、ユーザーに尋ねます。その後、`connection`パラメーターをAuth0.jsの[ログインメソッド](/docs/ja-jp/libraries/auth0js)に渡します。
## Lockと複数の接続
LockはIDプロバイダーを選択する機能性を備えています。ソーシャル接続には、特定のアプリで有効化されているものすべてのロゴが表示されます。また、データベース接続やActive Directory接続が有効な場合は、ユーザー名またはメールアドレスとパスワードの入力フィールドが提供されます。
ログインボタンは、アプリケーションに1つの接続だけが有効化されている場合([クラシックユニバーサルログイン](/docs/ja-jp/authenticate/login/auth0-universal-login/universal-login-vs-classic-login/classic-experience)エクスペリエンス)にのみ表示されます。それ以外の場合には、[カスタムUI](/docs/ja-jp/customize/login-pages/classic-login/customize-with-lock-sdk)または[新しいユニバーサルログイン](/docs/ja-jp/authenticate/login/auth0-universal-login/universal-login-vs-classic-login/universal-experience)を使う必要があります。そうすると、有効化されているソーシャル接続やエンタープライズ接続のすべてにボタンが表示されます。
## エンタープライズ接続でメールドメインを使用する
Lockには、メールのドメインを使って認証要求をルーティングする機能も備わっています。Auth0のエンタープライズ接続`ドメイン`にマッピングすることができます。たとえば、ADFSやSAML-P IDプロバイダーの構成では:
 マッピングされたドメインが接続に存在する場合、ユーザーがマッピングされたドメインのメールアドレスを入力すると、パスワード入力フィールドが自動的に無効になります。
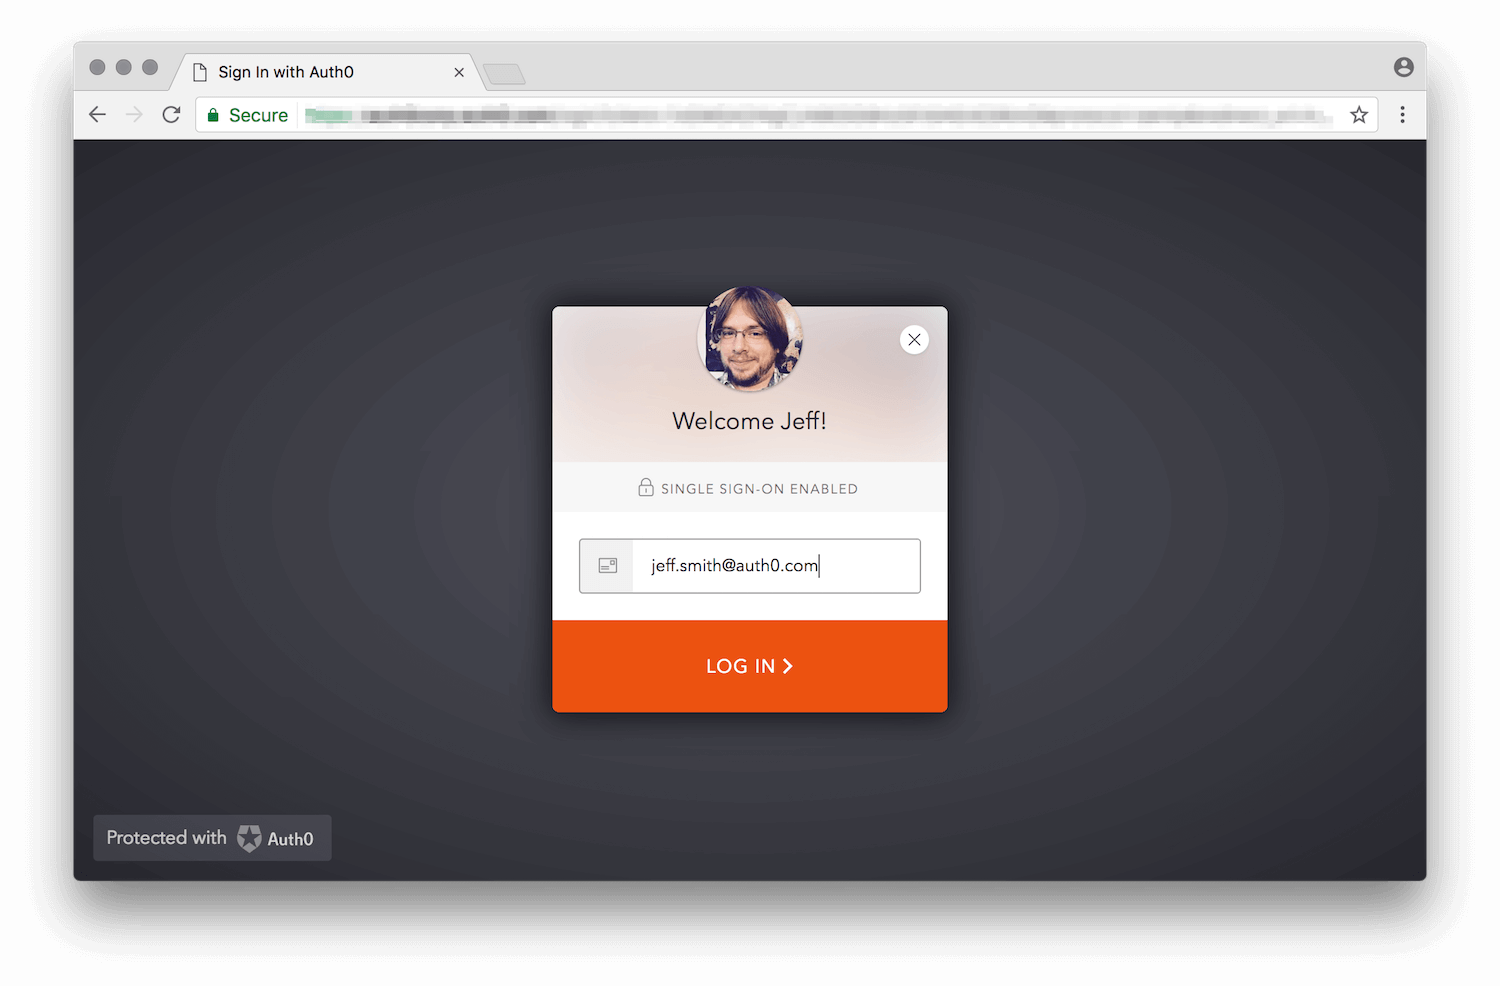 上の例では、ドメイン「`auth0.com`」がエンタープライズ接続にマッピングされています。
複数のドメインを1つの接続に関連付けることもできます。
## 複数のデータベース接続の中から選択する
アプリケーションに複数のデータベース接続が有効化されている場合、Lockはどれを使用するべきなのか知る必要があります。[`connectionResolver`オプション](https://github.com/auth0/lock#other-options)を使用すると、ユーザーの入力とコンテキストに応じて接続を決定する関数を渡すことができます。この例では、メールドメインがauth0.comの場合には、別のデータベース接続が使用されます。
```javascript lines theme={null}
var options = {
connectionResolver: function (username, context, cb) {
var domain = username.indexOf('@') !== -1 && username.split('@')[1];
if (domain && domain ==='auth0.com') {
// If the username is test@auth0.com, the connection used will be the `auth0-users` connection.
cb({ type: 'database', name: 'auth0-users' });
} else {
// Use the default approach to figure it out the connection
cb(null);
}
}
}
```
[`defaultDatabaseConnection`オプション](/docs/ja-jp/libraries/lock/v11/configuration#defaultdatabaseconnection-string-)を使用すると、デフォルトで使用するデータベース接続を指定することができます。
## 利用可能な接続をプログラムでフィルターする
Lockの[`allowedConnections`オプション](/docs/ja-jp/libraries/lock/v11/configuration#allowedconnections-array-)では、利用可能な接続の中からユーザーに提示できる接続を指定することができます。
そうすることで、他の入力やコンテキストを基にエクスペリエンスを調整することができます(「学生としてログインするならこちらをクリック、教員としてログインするならこちらをクリック」など)。
export const codeExample = `var lock = new Auth0Lock(
'{yourClientId}',
'{yourDomain}',
{
allowedConnections: ['yourConnection'];
}
);`;
また、`allowedConnections`オプションを`lock.show()`メソッドに渡すこともできます。これは、インスタンス化のタイミングでは不都合なときに有効です。詳細については、[APIのドキュメンテーション](/docs/ja-jp/libraries/lock/lock-api-reference)に記載の`show`メソッドを参照してください。
## アプリケーションからレルム情報を送信する
ユーザーが使うつもりのレルムについて、認証を要求しているアプリケーションが事前に知っていることもあります。たとえば、マルチテナントアプリケーションが`https://{customer}.yoursite.com`や`https://www.yoursite.com/{customer}`というURLを使う可能性があるとします。ユーザーがアプリケーションのバニティURLに到達したら、`tenant`の値を抽出し、`login_hint`の値として`authorize`要求で渡すことができます:
`https://{yourDomain}/authorize?client_id=[...]&login_hint={customer}`
`login_hint`は、ユーザーがログインに使うかもしれないものを認可サーバー(Auth0)へ教えるためのヒントです。この例では、ユーザーが到達したURLを基に、「customer」をレルムとして扱います。
デフォルトのホストされたログインページのコードは、これを使って、Lockのメールアドレス入力フィールドにあらかじめ入力しますが、コードを変更すれば、メールアドレスではなくレルムが渡されたときに使用されるデフォルトのデータベース接続を変更することができます。
```java lines theme={null}
// from the default Hosted Login Page template
var config = JSON.parse(decodeURIComponent(escape(window.atob('@@config@@'))));
[...]
var loginHint = config.extraParams.login_hint;
var realmHint;
// if the login hint is not an email address, we treat it as a realm hint
if (loginHint && loginHint.indexOf('@') < 0) {
realmHint = loginHint;
loginHint = null;
}
// now we map the realm into an actual database
var defaultDatabaseConnection;
if (realmHint === 'acme') {
defaultDatabaseConnection = 'acme-users';
} else if (realmHint === 'auth0') {
defaultDatabaseConnection = 'auth0-DB';
}
// When configuring Lock, we provide the values obtained before
var lock = new Auth0Lock(config.clientID, config.auth0Domain, {
[...] // other options
prefill: loginHint ? { email: loginHint, username: loginHint } : null,
defaultDatabaseConnection: defaultDatabaseConnection
}
```
上のコードはあくまでも一例です。このロジックを拡張すると、ソーシャル接続を除外したり、`login_hint`としてメールアドレスが渡されている場合でも、デフォルトの接続を使用したりできます。
「customer」を1つのレルムにマッピングしたのは、単に例を示すためであり、特に意味はありません。ですが、Auth0での「接続」という実在する概念からアプリケーションを切り離し、代わりにより抽象的な「レルム」という概念を使って、ホストされたログインページの内部でレルムから接続へのマッピングを行うのは、一般的に望ましいことです。
上の例では、ドメイン「`auth0.com`」がエンタープライズ接続にマッピングされています。
複数のドメインを1つの接続に関連付けることもできます。
## 複数のデータベース接続の中から選択する
アプリケーションに複数のデータベース接続が有効化されている場合、Lockはどれを使用するべきなのか知る必要があります。[`connectionResolver`オプション](https://github.com/auth0/lock#other-options)を使用すると、ユーザーの入力とコンテキストに応じて接続を決定する関数を渡すことができます。この例では、メールドメインがauth0.comの場合には、別のデータベース接続が使用されます。
```javascript lines theme={null}
var options = {
connectionResolver: function (username, context, cb) {
var domain = username.indexOf('@') !== -1 && username.split('@')[1];
if (domain && domain ==='auth0.com') {
// If the username is test@auth0.com, the connection used will be the `auth0-users` connection.
cb({ type: 'database', name: 'auth0-users' });
} else {
// Use the default approach to figure it out the connection
cb(null);
}
}
}
```
[`defaultDatabaseConnection`オプション](/docs/ja-jp/libraries/lock/v11/configuration#defaultdatabaseconnection-string-)を使用すると、デフォルトで使用するデータベース接続を指定することができます。
## 利用可能な接続をプログラムでフィルターする
Lockの[`allowedConnections`オプション](/docs/ja-jp/libraries/lock/v11/configuration#allowedconnections-array-)では、利用可能な接続の中からユーザーに提示できる接続を指定することができます。
そうすることで、他の入力やコンテキストを基にエクスペリエンスを調整することができます(「学生としてログインするならこちらをクリック、教員としてログインするならこちらをクリック」など)。
export const codeExample = `var lock = new Auth0Lock(
'{yourClientId}',
'{yourDomain}',
{
allowedConnections: ['yourConnection'];
}
);`;
また、`allowedConnections`オプションを`lock.show()`メソッドに渡すこともできます。これは、インスタンス化のタイミングでは不都合なときに有効です。詳細については、[APIのドキュメンテーション](/docs/ja-jp/libraries/lock/lock-api-reference)に記載の`show`メソッドを参照してください。
## アプリケーションからレルム情報を送信する
ユーザーが使うつもりのレルムについて、認証を要求しているアプリケーションが事前に知っていることもあります。たとえば、マルチテナントアプリケーションが`https://{customer}.yoursite.com`や`https://www.yoursite.com/{customer}`というURLを使う可能性があるとします。ユーザーがアプリケーションのバニティURLに到達したら、`tenant`の値を抽出し、`login_hint`の値として`authorize`要求で渡すことができます:
`https://{yourDomain}/authorize?client_id=[...]&login_hint={customer}`
`login_hint`は、ユーザーがログインに使うかもしれないものを認可サーバー(Auth0)へ教えるためのヒントです。この例では、ユーザーが到達したURLを基に、「customer」をレルムとして扱います。
デフォルトのホストされたログインページのコードは、これを使って、Lockのメールアドレス入力フィールドにあらかじめ入力しますが、コードを変更すれば、メールアドレスではなくレルムが渡されたときに使用されるデフォルトのデータベース接続を変更することができます。
```java lines theme={null}
// from the default Hosted Login Page template
var config = JSON.parse(decodeURIComponent(escape(window.atob('@@config@@'))));
[...]
var loginHint = config.extraParams.login_hint;
var realmHint;
// if the login hint is not an email address, we treat it as a realm hint
if (loginHint && loginHint.indexOf('@') < 0) {
realmHint = loginHint;
loginHint = null;
}
// now we map the realm into an actual database
var defaultDatabaseConnection;
if (realmHint === 'acme') {
defaultDatabaseConnection = 'acme-users';
} else if (realmHint === 'auth0') {
defaultDatabaseConnection = 'auth0-DB';
}
// When configuring Lock, we provide the values obtained before
var lock = new Auth0Lock(config.clientID, config.auth0Domain, {
[...] // other options
prefill: loginHint ? { email: loginHint, username: loginHint } : null,
defaultDatabaseConnection: defaultDatabaseConnection
}
```
上のコードはあくまでも一例です。このロジックを拡張すると、ソーシャル接続を除外したり、`login_hint`としてメールアドレスが渡されている場合でも、デフォルトの接続を使用したりできます。
「customer」を1つのレルムにマッピングしたのは、単に例を示すためであり、特に意味はありません。ですが、Auth0での「接続」という実在する概念からアプリケーションを切り離し、代わりにより抽象的な「レルム」という概念を使って、ホストされたログインページの内部でレルムから接続へのマッピングを行うのは、一般的に望ましいことです。