> ## Documentation Index
> Fetch the complete documentation index at: https://docs-dev-docs-event-stream-action-templates.mintlify.site/llms.txt
> Use this file to discover all available pages before exploring further.
# Pushed Authorization Requests(PAR)を構成する
> アプリケーションにPushed Authorization Requests(PAR)を構成する方法を説明します。
ハイリーレギュレーテッドアイデンティティ機能を使用するには、エンタープライズプランとハイリーレギュレーテッドアイデンティティアドオンが必要です。詳細については、「[Auth0の価格設定](https://auth0.com/pricing/)」を参照してください。
Auth0によるPush Authorization Request(PAR)の実装は、[OAuth RFC9126:Push Authorization Requests](https://www.rfc-editor.org/rfc/rfc9126.html)仕様に基づいています。詳細については、「[Pushed Authorization Requestsを使用した認可コードフロー](/docs/ja-jp/get-started/authentication-and-authorization-flow/authorization-code-flow/authorization-code-flow-with-par)」を参照してください。
デフォルトでは、許可サーバーはPARを必要としません。そのため、認可要求はPARエンドポイントと`/authorize`エンドポイントに送信することができます。認可フローを完全にセキュリティで保護するには、[Management API](https://auth0.com/docs/api/management/v2)またはAuth0 Dashboardの\*\*[Application Settings(アプリケーションの設定)]\*\* を使用して、アプリケーションやテナントでPARを必須にしてください。
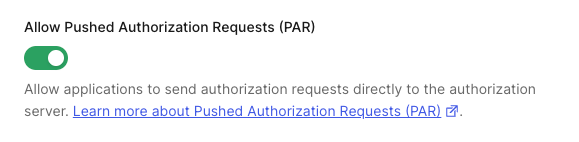
## テナントにPARを設定する
テナントでPARを設定するには、[Auth0 Dashboard](https://manage.auth0.com/)を使用します。
1.[Auth0 Dashboard]>[Settings(設定)]>[Advanced(詳細設定)]に移動します。
2.**[Settings(設定)]** まで下へスクロールして、**[Allow Pushed Authorization Requests(PAR)(Pushed Authorization Requests(PAR)を許可する)]** をオンにします。
 ## アプリケーションにPARを設定する
アプリケーションレベルでPARを有効化する前に、テナントレベルで\*\*[Allow Pushed Authorization Requests (PAR)(Pushed Authorization Requests(PAR)を許可する)]\*\* が有効化されていなければなりません。
1. [Auth0 Dashboard] > [Applications(アプリケーション)]に移動します。
2. アプリケーションを選択します。
3. **[Application Settings(アプリケーション設定)]** タブを選択します。
4. **[Authorization Requests(認可要求)]** セクションで、**[Require Pushed Authorization Requests (PAR)(プッシュ認可要求(PAR)を必須にする)]** を有効にします。
アプリケーションレベルでPARを有効化する前に、テナントレベルで\*\*[Allow Pushed Authorization Requests (PAR)(Pushed Authorization Requests(PAR)を許可する)]\*\* が有効化されていなければなりません。
次のコードサンプルを使用して、Management APIでアプリケーションのPARを構成します。
```bash lines theme={null}
curl -X PATCH --location 'https://TENANT.auth0.com/api/v2/clients/CLIENT_ID' \
--header 'Authorization: Bearer MANAGEMENT_ACCESS_TOKEN' \
--header 'Content-Type: application/json' \
--data-raw '{
"require_pushed_authorization_requests": true
}'
```
## もっと詳しく
* [Pushed Authorization Requests(PAR)を使った認可コードフロー](/docs/ja-jp/get-started/authentication-and-authorization-flow/authorization-code-flow/authorization-code-flow-with-par)
## アプリケーションにPARを設定する
アプリケーションレベルでPARを有効化する前に、テナントレベルで\*\*[Allow Pushed Authorization Requests (PAR)(Pushed Authorization Requests(PAR)を許可する)]\*\* が有効化されていなければなりません。
1. [Auth0 Dashboard] > [Applications(アプリケーション)]に移動します。
2. アプリケーションを選択します。
3. **[Application Settings(アプリケーション設定)]** タブを選択します。
4. **[Authorization Requests(認可要求)]** セクションで、**[Require Pushed Authorization Requests (PAR)(プッシュ認可要求(PAR)を必須にする)]** を有効にします。
アプリケーションレベルでPARを有効化する前に、テナントレベルで\*\*[Allow Pushed Authorization Requests (PAR)(Pushed Authorization Requests(PAR)を許可する)]\*\* が有効化されていなければなりません。
次のコードサンプルを使用して、Management APIでアプリケーションのPARを構成します。
```bash lines theme={null}
curl -X PATCH --location 'https://TENANT.auth0.com/api/v2/clients/CLIENT_ID' \
--header 'Authorization: Bearer MANAGEMENT_ACCESS_TOKEN' \
--header 'Content-Type: application/json' \
--data-raw '{
"require_pushed_authorization_requests": true
}'
```
## もっと詳しく
* [Pushed Authorization Requests(PAR)を使った認可コードフロー](/docs/ja-jp/get-started/authentication-and-authorization-flow/authorization-code-flow/authorization-code-flow-with-par)