> ## Documentation Index
> Fetch the complete documentation index at: https://docs-dev-docs-event-stream-action-templates.mintlify.site/llms.txt
> Use this file to discover all available pages before exploring further.
> Learn how the Device Authorization flow works and why you should use it for input-constrained devices, such as smart TVs and media consoles. For use with native apps.
# Device Authorization Flow
With input-constrained devices that connect to the internet, rather than authenticate the user directly, the device asks the user to go to a link on their computer or smartphone and authorize the device. This avoids a poor user experience for devices that do not have an easy way to enter text. To do this, device apps use the Device Authorization Flow (ratified in [OAuth 2.0](https://tools.ietf.org/html/rfc8628)), in which they pass along their Client ID to initiate the authorization process and get a token.
## How it works
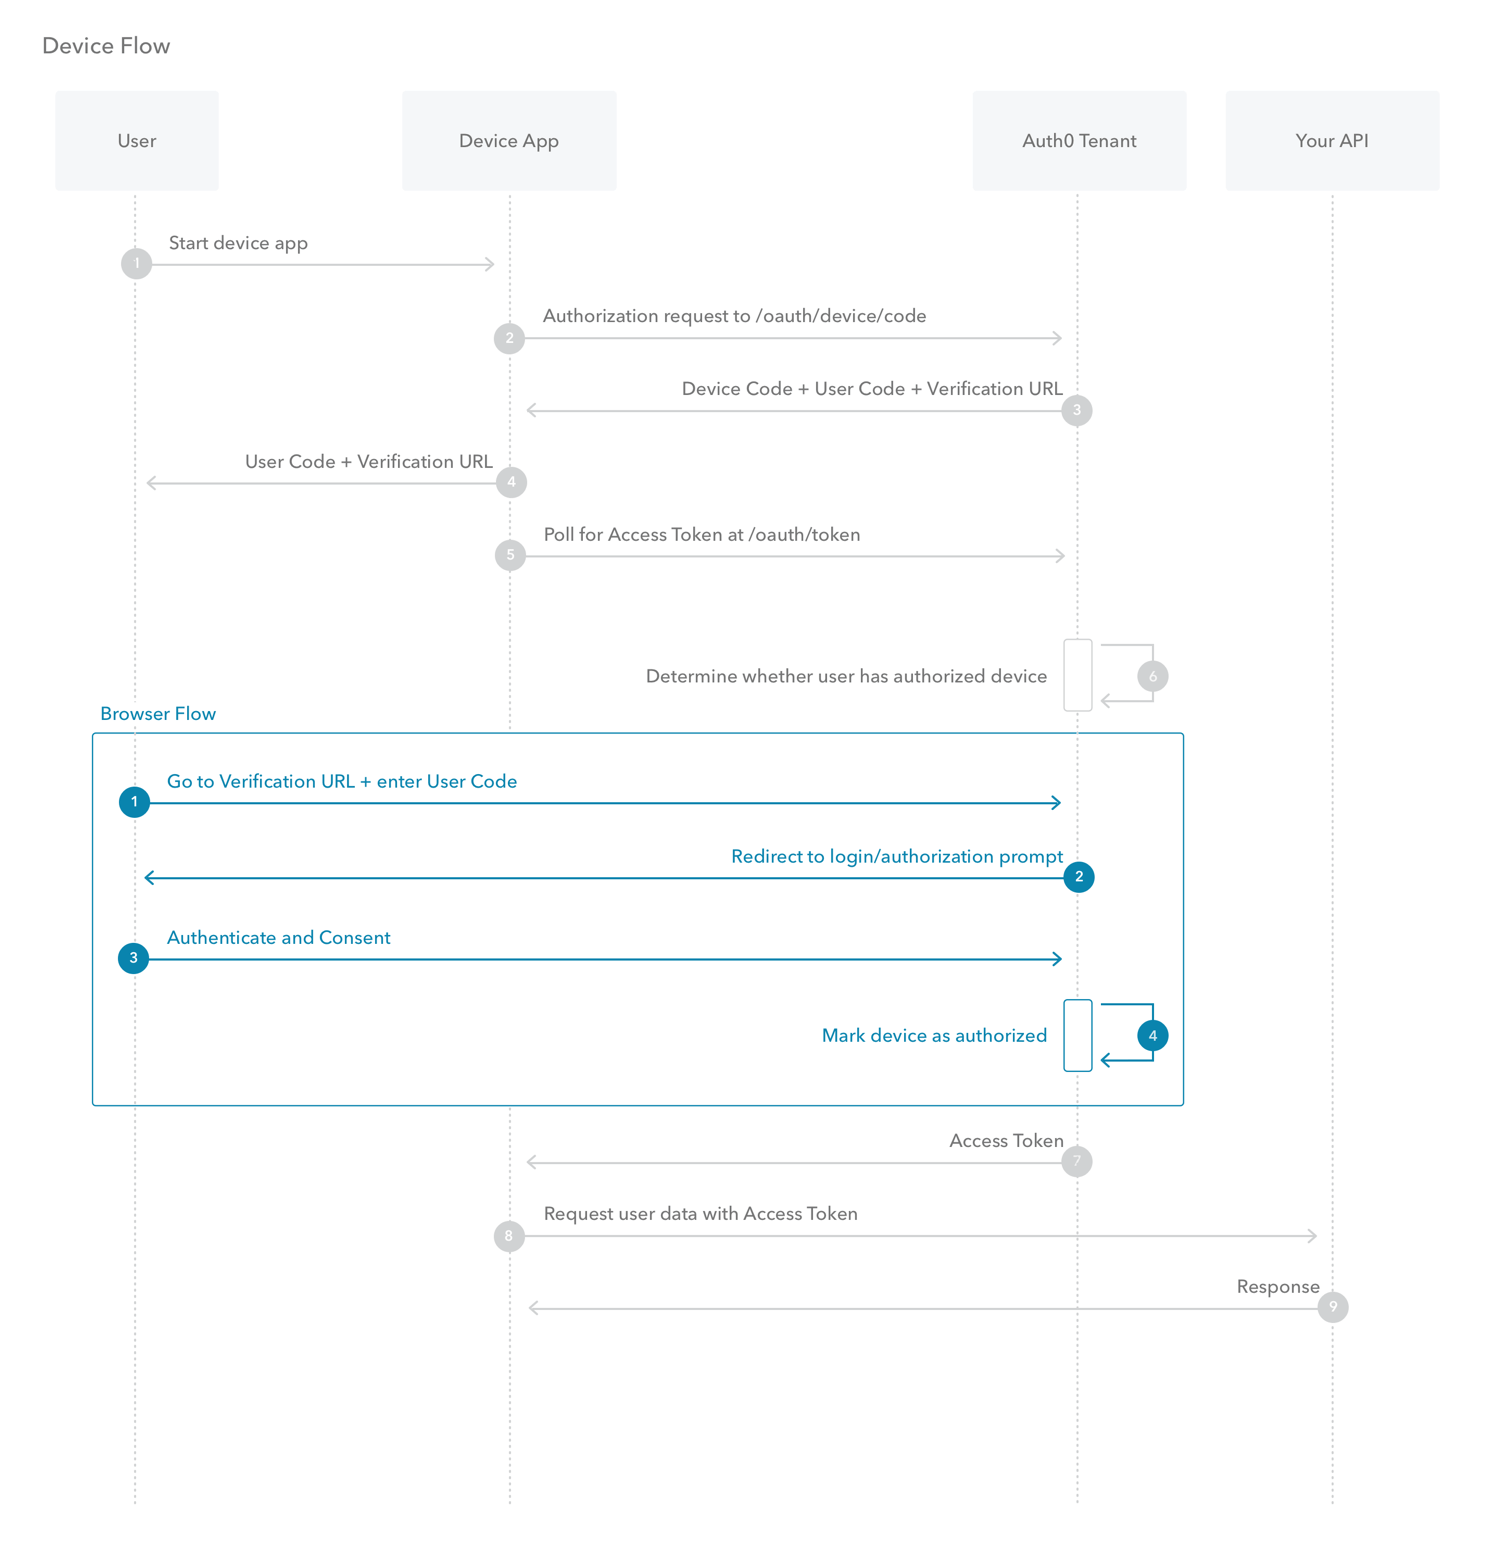
The Device Authorization Flow contains two different paths; one occurs on the device requesting authorization and the other occurs in a browser. The browser flow path, wherein a device code is bound to the session in the browser, occurs in parallel to part of the device flow path.
 ### Device Flow
1. The user starts the app on the device.
2. The device app requests authorization from the Auth0 Authorization Server using its Client ID (`/oauth/device/code` endpoint).
3. The Auth0 Authorization Server responds with a `device_code`, `user_code`, `verification_uri`, `verification_uri_complete` `expires_in` (lifetime in seconds for `device_code` and `user_code`), and polling `interval`.
4. The device app asks the user to activate using their computer or smartphone. The app may accomplish this by:
* asking the user to visit the `verification_uri` and enter the `user_code` after displaying these values on-screen
* asking the user to interact with either a QR Code or shortened URL with embedded user code generated from the `verification_uri_complete`
* directly navigating to the verification page with embedded user code using `verification_uri_complete`, if running natively on a browser-based device
5. The device app begins polling your Auth0 Authorization Server for an Access Token (**/oauth/token** endpoint) using the time period specified by `interval` and counting from receipt of the last polling request's response. The device app continues polling until either the user completes the browser flow path or the user code expires.
6. When the user successfully completes the browser flow path, your Auth0 Authorization Server responds with an Access Token (and optionally, a Refresh Token). The device app should now forget its `device_code` because it will expire.
7. Your device app can use the Access Token to call an API to access information about the user.
8. The API responds with requested data.
### Browser Flow
1. The user visits the `verification_uri` on their computer, enters the `user_code` and confirms that the device that is being activated is displaying the `user_code`. If the user visits the `verification_uri_complete` by any other mechanism (such as by scanning a QR code), only the device confirmation will be needed.
2. Your Auth0 Authorization Server redirects the user to the login and consent prompt, if needed.
3. The user authenticates using one of the configured login options and may see a consent page asking to authorize the device app.
4. Your device app is authorized to access the API.
## How to implement it
The easiest way to implement the Device Authorization Flow is to follow our tutorial: [Call API Using Device Authorization Flow](/docs/get-started/authentication-and-authorization-flow/device-authorization-flow/call-your-api-using-the-device-authorization-flow).
## Force device reauthorization
To force the user to reauthorize a device, you must revoke the Refresh Token assigned to the device. To learn how, read [Unlink Devices from Users](/docs/manage-users/user-accounts/unlink-devices-from-users). Note that the device will not be forced to reauthorize until the current Access Token expires and the application tries to use the revoked Refresh Token. To learn more about Refresh Tokens, read [Refresh Tokens](/docs/secure/tokens/refresh-tokens).
## Learn more
* [Tokens](/docs/secure/tokens)
* [Token Best Practices](/docs/secure/tokens/token-best-practices)
* [Which OAuth 2.0 Flow Should I Use?](/docs/get-started/authentication-and-authorization-flow/which-oauth-2-0-flow-should-i-use)
* [Auth0 Actions](/docs/customize/actions)
### Device Flow
1. The user starts the app on the device.
2. The device app requests authorization from the Auth0 Authorization Server using its Client ID (`/oauth/device/code` endpoint).
3. The Auth0 Authorization Server responds with a `device_code`, `user_code`, `verification_uri`, `verification_uri_complete` `expires_in` (lifetime in seconds for `device_code` and `user_code`), and polling `interval`.
4. The device app asks the user to activate using their computer or smartphone. The app may accomplish this by:
* asking the user to visit the `verification_uri` and enter the `user_code` after displaying these values on-screen
* asking the user to interact with either a QR Code or shortened URL with embedded user code generated from the `verification_uri_complete`
* directly navigating to the verification page with embedded user code using `verification_uri_complete`, if running natively on a browser-based device
5. The device app begins polling your Auth0 Authorization Server for an Access Token (**/oauth/token** endpoint) using the time period specified by `interval` and counting from receipt of the last polling request's response. The device app continues polling until either the user completes the browser flow path or the user code expires.
6. When the user successfully completes the browser flow path, your Auth0 Authorization Server responds with an Access Token (and optionally, a Refresh Token). The device app should now forget its `device_code` because it will expire.
7. Your device app can use the Access Token to call an API to access information about the user.
8. The API responds with requested data.
### Browser Flow
1. The user visits the `verification_uri` on their computer, enters the `user_code` and confirms that the device that is being activated is displaying the `user_code`. If the user visits the `verification_uri_complete` by any other mechanism (such as by scanning a QR code), only the device confirmation will be needed.
2. Your Auth0 Authorization Server redirects the user to the login and consent prompt, if needed.
3. The user authenticates using one of the configured login options and may see a consent page asking to authorize the device app.
4. Your device app is authorized to access the API.
## How to implement it
The easiest way to implement the Device Authorization Flow is to follow our tutorial: [Call API Using Device Authorization Flow](/docs/get-started/authentication-and-authorization-flow/device-authorization-flow/call-your-api-using-the-device-authorization-flow).
## Force device reauthorization
To force the user to reauthorize a device, you must revoke the Refresh Token assigned to the device. To learn how, read [Unlink Devices from Users](/docs/manage-users/user-accounts/unlink-devices-from-users). Note that the device will not be forced to reauthorize until the current Access Token expires and the application tries to use the revoked Refresh Token. To learn more about Refresh Tokens, read [Refresh Tokens](/docs/secure/tokens/refresh-tokens).
## Learn more
* [Tokens](/docs/secure/tokens)
* [Token Best Practices](/docs/secure/tokens/token-best-practices)
* [Which OAuth 2.0 Flow Should I Use?](/docs/get-started/authentication-and-authorization-flow/which-oauth-2-0-flow-should-i-use)
* [Auth0 Actions](/docs/customize/actions)