> ## Documentation Index
> Fetch the complete documentation index at: https://docs-dev-docs-event-stream-action-templates.mintlify.site/llms.txt
> Use this file to discover all available pages before exploring further.
> Solutions Overview for the Mobile + API architecture scenario
# Solution Overview (Mobile Apps + API)
In order to ensure that only authorized users and applications are allowed access to the Timesheets API, ExampleCo has decided to make use of the [OAuth 2.0 authorization framework](https://tools.ietf.org/html/rfc6749). The framework provides the flexibility the company wants since the different grants can allow them to easily authorize the various types of applications which need to communicate with the Timesheets API.
## API Authentication and Authorization
An API is a way to expose functionality of your application to other applications. An application can make a request by sending a message to an endpoint on an API and receive information as a response.
An API endpoint can be secured or not. In our case, since the timesheets are sensitive information that affect reviews and payments, it is important to ensure that only authorized users and applications can call the endpoints on our API. When a client application wants to access protected endpoints on an API, it needs to present an Access Token as proof that it has the required permissions for making the call to the endpoint.
An Access Token is obtained by authenticating the user with an Authorization Server and the user can then, in turn, authorize the application to access the API on their behalf.
An Access Token (also referred to as `access_token`) is an opaque string representing an authorization issued to the application. It may denote an identifier used to retrieve the authorization information or may self-contain the authorization information (for example, the user's identity, permissions, and so forth) in a verifiable manner.
It is quite common for Access Tokens to be implemented as [JSON Web Tokens](/docs/secure/tokens/json-web-tokens).
For more information on Auth0 Access Tokens refer to [Access Token](/docs/secure/tokens/access-tokens).
An API can enforce fine-grained control over who can access the various endpoints exposed by the API. These permissions are expressed as scopes.
When a user authorizes a client application, the application can also indicate which permissions it requires. The user is then allowed to review and grant these permissions. These permissions are then included in the Access Token as part of the `scope` claim.
Subsequently, when the client passes along the Access Token when making requests to the API, the API can inspect the `scope` claim to ensure that the required permissions were granted in order to call the particular API endpoint.
Each Access Token may include a list of the permissions that have been granted to the client. When a client authenticates with Auth0, it will specify the list of scopes (or permissions) it is requesting. If those scopes are authorized, then the Access Token will contain a list of authorized scopes.
For example, the timesheet API may accept four different levels of authorization: reading timesheets (scope `read:timesheets`), creating timesheets (scope `create:timesheets`), deleting timesheets (scope `delete:timesheets`) and approving timesheets (scope `approve:timesheets`).
When a client asks the API to create a new timesheet entry, then the Access Token should contain the `create:timesheets` scope. In a similar fashion, in order to delete existing timesheets, the Access Token should contain the `delete:timesheets` scope.
For more information on scopes refer to [Scopes](/docs/get-started/apis/scopes).
By using the OAuth 2.0 authorization framework, you can give your own applications or third-party applications limited access to your APIs on behalf of the application itself. Using Auth0, you can easily support different flows in your own APIs without worrying about the OAuth 2.0/OpenID Connect (OIDC) specification, or the many other technical aspects of API authorization.
In any OAuth 2.0 flow we can identify the following roles:
* **Resource Owner**: the entity that can grant access to a protected resource. Typically this is the end-user.
* **Resource Server**: the server hosting the protected resources. This is the API you want to access.
* **Client**: an application requesting access to a protected resource on behalf of the Resource Owner.
* **Authorization Server**: the server that authenticates the Resource Owner, and issues Access Tokens after getting proper authorization. In this case, Auth0's Authentication API.
[Grants types (or flows)](/docs/get-started/authentication-and-authorization-flow/which-oauth-2-0-flow-should-i-use) determine how these participants interact to grant to the applications limited access to the APIs you are building. As a result, the app will obtain an access token that can be used to call the API on behalf of the user.
## Proof Key for Code Exchange (PKCE)
OAuth 2 provides several grant types for different use cases. In this particular use case, we want to access the API from a mobile application, which will use the [Authorization Code Flow with Proof Key for Code Exchange (PKCE)](/docs/get-started/authentication-and-authorization-flow/authorization-code-flow-with-pkce) to do so.
The [Authorization Code Flow](/docs/get-started/authentication-and-authorization-flow/authorization-code-flow) has some security issues when implemented on native applications. For instance, a malicious attacker can intercept the `authorization_code` returned by Auth0 and exchange it for an [Access Token](/docs/secure/tokens/access-tokens) (and possibly a [Refresh Token](/docs/secure/tokens/refresh-tokens)).
The Proof Key for Code Exchange (PKCE) (defined in [RFC 7636](https://tools.ietf.org/html/rfc7636)) is a technique used to mitigate this authorization code interception attack.
With PKCE, the Application creates, for every authorization request, a cryptographically random key called `code_verifier` and its transformed value called `code_challenge`, which is sent to Auth0 to get the `authorization_code`. When the Application receives the `authorization_code`, it will send the code and the `code_verifier` to Auth0's token endpoint to exchange them for the requested tokens.
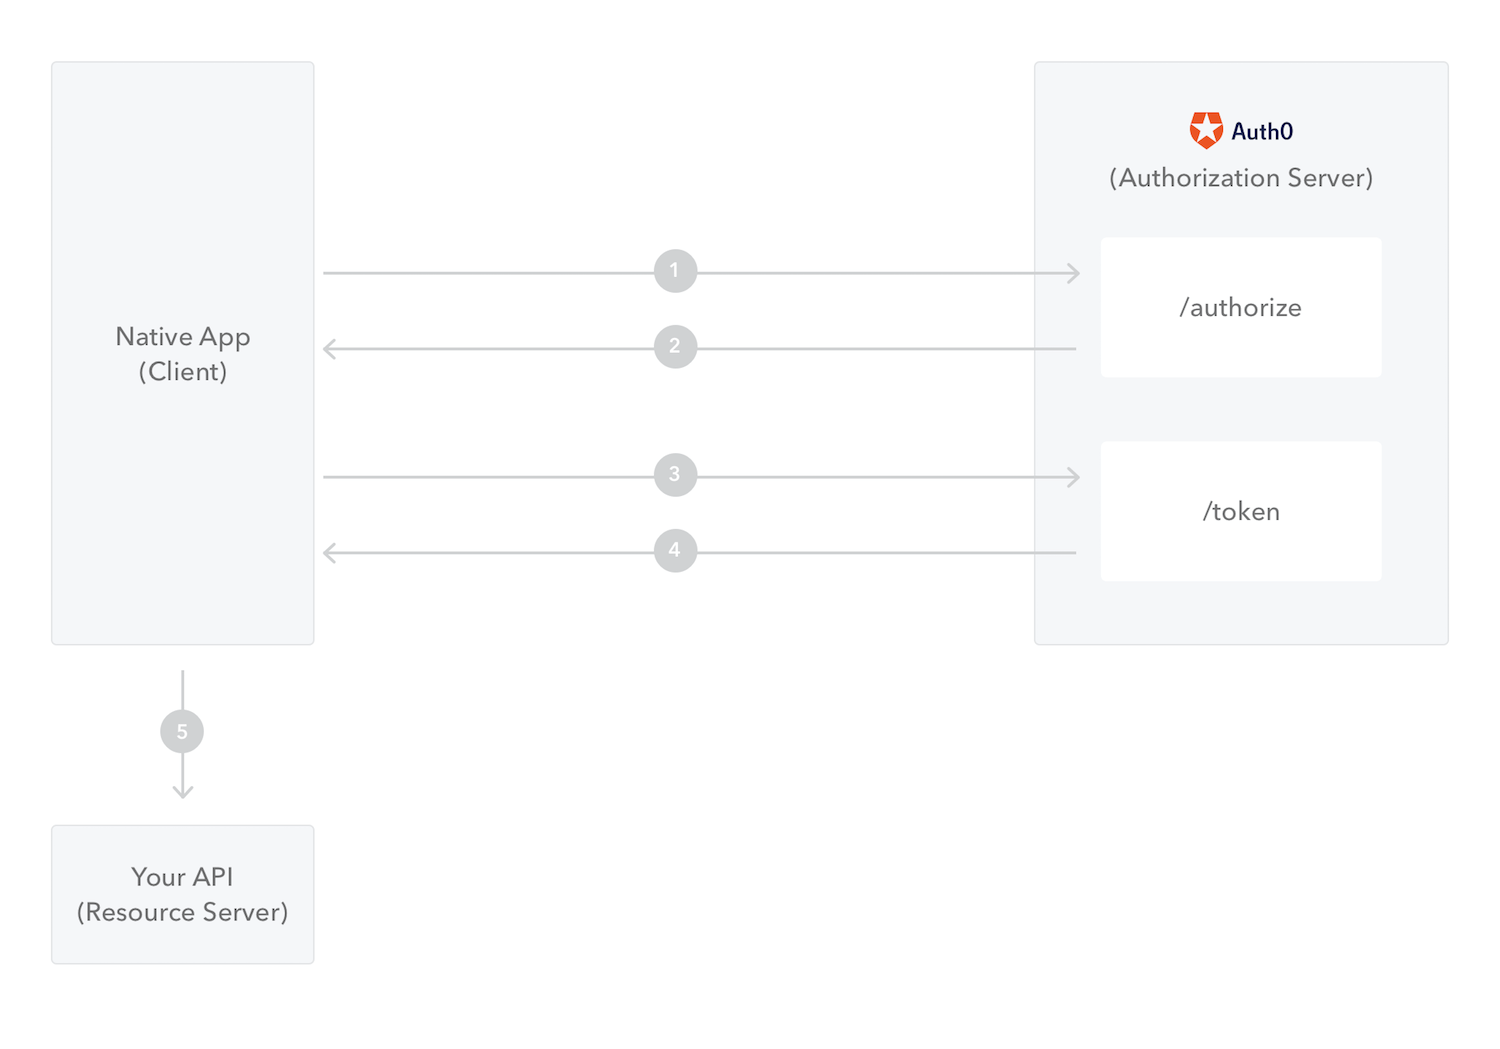 1. The native app initiates the flow and redirects the user to Auth0 (specifically to the [/authorize endpoint](https://auth0.com/docs/api/authentication#authorization-code-grant-pkce-)), sending the `code_challenge` and `code_challenge_method` parameters.
2. Auth0 redirects the user to the native app with an `authorization_code` in the query string.
3. The native app sends the `authorization_code` and `code_verifier` together with the `redirect_uri` and the `client_id` to Auth0. This is done using the [/oauth/token endpoint](https://auth0.com/docs/api/authentication?http#authorization-code-pkce-).
4. Auth0 validates this information and returns an Access Token (and optionally a Refresh Token).
5. The native app can use the Access Token to call the API on behalf of the user.
If you have [Refresh Token Rotation](/docs/secure/tokens/refresh-tokens/refresh-token-rotation) enabled, a new Refresh Token is generated with each request and issued along with the Access Token. When a Refresh Token is exchanged, the previous Refresh Token is invalidated but information about the relationship is retained by the authorization server.
## Authorization Extension
The [Auth0 Authorization Extension](/docs/customize/extensions/authorization-extension) allows you to provide authorization support in your application, by assigning Roles, Groups and Permissions to Users.
The Authorization Extension creates a [Rule](/docs/customize/rules) which will augment the User profile during the authentication flow with the Roles, Groups and Permissions assigned to the user. You can then use this information to ensure that the Access Token issued to a user only contains scopes which are allowed according to the permissions defined in the Authorization Extension.
PREVIOUS TUTORIAL [Introduction](/docs/get-started/architecture-scenarios/mobile-api)
NEXT TUTORIAL [2. Auth0 Configuration](/docs/get-started/architecture-scenarios/mobile-api/part-2)
1. The native app initiates the flow and redirects the user to Auth0 (specifically to the [/authorize endpoint](https://auth0.com/docs/api/authentication#authorization-code-grant-pkce-)), sending the `code_challenge` and `code_challenge_method` parameters.
2. Auth0 redirects the user to the native app with an `authorization_code` in the query string.
3. The native app sends the `authorization_code` and `code_verifier` together with the `redirect_uri` and the `client_id` to Auth0. This is done using the [/oauth/token endpoint](https://auth0.com/docs/api/authentication?http#authorization-code-pkce-).
4. Auth0 validates this information and returns an Access Token (and optionally a Refresh Token).
5. The native app can use the Access Token to call the API on behalf of the user.
If you have [Refresh Token Rotation](/docs/secure/tokens/refresh-tokens/refresh-token-rotation) enabled, a new Refresh Token is generated with each request and issued along with the Access Token. When a Refresh Token is exchanged, the previous Refresh Token is invalidated but information about the relationship is retained by the authorization server.
## Authorization Extension
The [Auth0 Authorization Extension](/docs/customize/extensions/authorization-extension) allows you to provide authorization support in your application, by assigning Roles, Groups and Permissions to Users.
The Authorization Extension creates a [Rule](/docs/customize/rules) which will augment the User profile during the authentication flow with the Roles, Groups and Permissions assigned to the user. You can then use this information to ensure that the Access Token issued to a user only contains scopes which are allowed according to the permissions defined in the Authorization Extension.
PREVIOUS TUTORIAL [Introduction](/docs/get-started/architecture-scenarios/mobile-api)
NEXT TUTORIAL [2. Auth0 Configuration](/docs/get-started/architecture-scenarios/mobile-api/part-2)